Making and How to Make Model Frozen Ponds, Streams and Miniature Waterfalls
Christmas Village Displays

Creating frozen water within any winter scenery can really make the landscape feel cold and frosty, like Christmas has arrived. Small curving pond-shaped mirrors are an easy solution here, but there are more effective possibilities if you have the time and know-how.
As is so often the case with model making, there are many, many different ways that the effect of ice can be created, although not all are cheap. Therefore, either PVA glue or clear silicone sealant are ideal, both of which are quite affordable and easily available from DIY stores everywhere. More expensive are different kinds of 'realistic water', sold in small bottles from most model shops.
When creating a frozen lake or pond for your Christmas village, think very carefully about how big it needs to be and where it is ultimately going to be positioned. Will it connect to a stream, or will a bridge be positioned close by?
Sketch out your design (an irregular shape often looks most realistic) onto an old piece of thin plastic, such as a chopping board or Tupperware container lid. Cut to shape and then paint one side with a very dark blue colour, leaving to thoroughly dry. Paint with PVA glue and cover (almost to the edges) with a piece of slightly scrunched plastic food wrap (cling film), to provide a slightly uneven texture, rather like rippled cracked ice.
PVA Glue and Landscaping
Carefully pour PVA glue into the centre of the food wrap and then brush to the edges. Sprinkle some fine gravel and coarse sand around the outside of the lake to form a boundary and add pockets of larger rocks, to appear more natural and less formal.
Since the plastic base and food wrap are not porous, it can take several days to completely dry and become clear, so a little patience is needed and a warm spot should be chosen for this stage. Any surface bubbles should naturally disperse and disappear, although if any remain, these can be popped with a pin.
Once dry, add a second coat of PVA glue. If you would like the frozen water to look particularly icy, then mix in a small amount of white paint. This process can then be repeated until the thickness of the 'ice' creates the desired effect.
When the last coat has been added (two or three coats of PVA is normally enough), you can complete your landscaping by sticking on a little dried moss or coloured reindeer moss around parts of the edge, taking care that the colour from the moss does not leach into the glue. To create seasonal dead reeds, cut up an old paint brush and group the brush hairs (bristles) in clumps of glue, holding them in place with a little gravel. These 'reeds' really are the finishing touch and can look incredibly realistic and grass-like.
How to Make a Frozen Stream
A stream can be created in a similar way, although if you are looking to give the illusion of frozen running water, then clear silicone sealant is ideal for this purpose.
Once you have covered your painted stream cutout with silicone (perhaps using aluminium foil for a sparkly base), use a cocktail stick, toothpick, pen lid, screwdriver or similar tool to smooth the surface layer and introduce a little movement into the overall texture. This needs to be done fairly quickly, before the silicone sealant starts to set.
A far quicker alternative is to just use a long length of plastic food wrap, scrunched into the shape of a narrow meandering stream and positioned directly onto your base, sitting on top of the snow. This may sound somewhat simplistic, but it does produce an extremely convincing effect for virtually no outlay.
How to Make Model Waterfalls
Piping lengths of clear silicone sealant on plastic is an effective way of making a waterfall. Once dry, this sealant can be peeled off the non-stick plastic base and then glued into place, perhaps cascading down the side of a mountain into your icy lake or stream at the bottom.
Photograph of a small mirror pond made by Lemax:
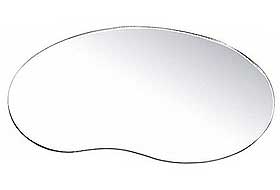
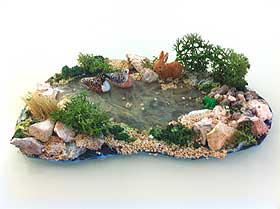
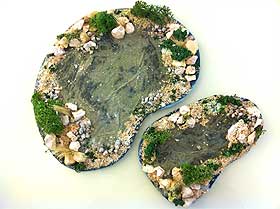
Image of two homemade model ponds, landscaping using green reindeer moss, small stones and sand:
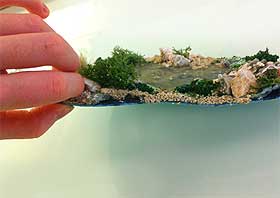
Side view of the smallest pond, showing its scale and depth, as well as its thin semi-rigid plastic base:
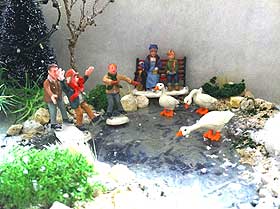
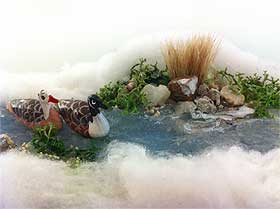
Picture of small plastic model geese standing on 'frozen' water made from PVA glue:

Photo of tiny miniature painted ducks and geese, made from wood and purchased from a local Dolls House shop:

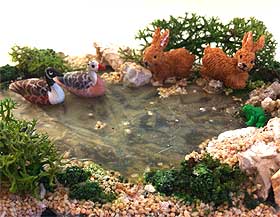
Close-up image of miniature rabbits and geese, sat on the edge of the icy 'PVA' water:
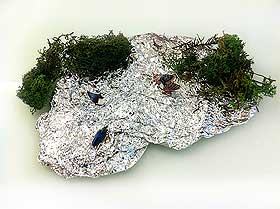
This picture shows a simple pond made using 'scrunched' aluminium foil. Taking just a minute or two to make, this model can be quite effective when landscaped into its setting and softened with snow flakes or snow spray.