Making and How to Make Model Christmas Trees
Christmas Village Displays

There are several ways that you can make your very own model Christmas trees from scratch, although the various methods do create very different end results, some of which are certainly more realistic than others. Just a backdrop alone with a few two-dimensional photo printouts of trees can add a wintery character and the feeling of a mountainscape.
Experienced model railway enthusiasts are often keen to create something true to nature that will sit nicely on a verdant hillside. However, in a Christmas village, it is generally quite acceptable not to get too carried away with trying to craft the perfect miniature Norway spruce or Douglas fir. This is particularly the case since the completed tree will likely be covered with decorations or lightly frosted with snow spray anyway, often being placed on a mountain towards the back, away from the eyes of perfectionists.
Whatever method you choose, be mindful that different shapes and sizes all make for a more natural appearance when combined together.
Possible methods for making Christmas tree models include:- Trimming old bottle brushes to size and shape
- Threading dried, sprayed asparagus fern leaves into thin lengths of tapering doweling
- Shaping the 'twigs' of old artificial Christmas tree branches
- Making rough cone shapes from bunches of green reindeer moss, supported on small twigs
- Painting old pine cones green and sprinkling with glitter
Below are two of the most popular and most effective methods of model tree making, both of which are actually really quite easy when broken down into the various stages.
How to Make Wire and Fibre Trees
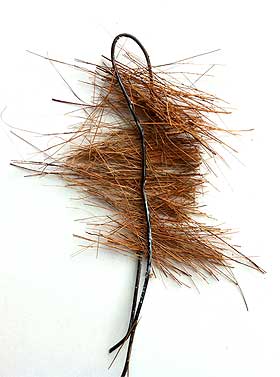
Cut a length of flexible garden wire and loop in half. Cover one of the wire lengths with glue (a glue stick is fine, or paint with PVA glue) and then carefully arrange some straight fibres along the length. Possible fibres include old paint brush bristles, coconut fibres, untwisted garden string, jute twine or bailing twine (it may be necessary to boil this first to straighten the twine fibres).
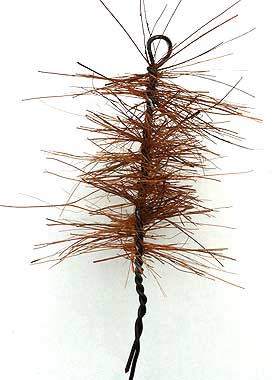
Hold each end of the wire firmly and begin to twist, and you will immediately see the fibres starting to spiral around as the wire joins together, rather like a thin corkscrew. The tighter you twist the wire, the firmer the fibres will be held in place, regardless of glue. If you have a lot of trees to make, you can use an electric drill to speed up the twisting process, inserting the wire into the drill and fixing the other end to a board, with a staple or nail.

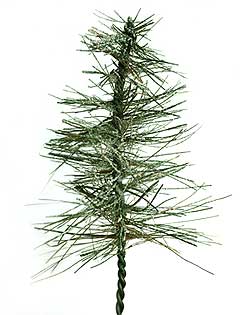
Once you have finished twisting, trim your new model Christmas tree to shape, spray green and frost it with some good quality snow spray. Then, insert the wire trunk into some modelling clay or white plasticine for a firm base.
How to Make Fimo Trees
Making model Christmas trees using Fimo (a polymer clay) will always create something a little more 'cartoony' than when using the fibre / bristle method, although this method can be equally impressive and the tree will look at home in any winter village setting. In fact, the resultant spruces actually resemble those sold by Lemax to grace the side of their ice skating ponds and other moving table pieces.
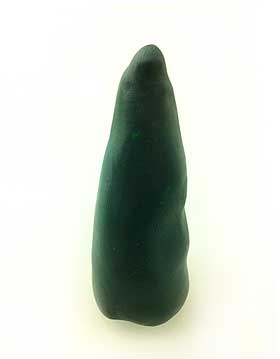
Mould your green Fimo clay into a cone shape with a wide base, making sure that the top is not too thin. Take a sharp pair of scissors and carefully snip into the Fimo to create overlapping rows of small triangle shapes. The trick here is to make sure that you hold the scissors almost parallel to the side of the cone.
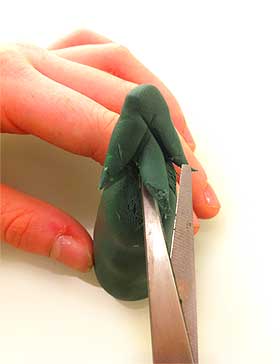
The cuts do not need to be too neat and uniform, since you are trying to sculpt the shape of a mountain spruce. A few irregularities or cracks in the clay will often make the finished tree appear all the more natural and pleasing. Angle the bases of the branches upwards to form a curve and decorate with small 'baubles' of brightly coloured Fimo, perhaps topping with a yellow or golden star.


If you find any of this process a little fiddly, try using a pair of tweezers for the more intricate work. Finally, bake in an oven (on an ovenproof plate) at a very low temperature to prevent discolouring (always follow the instructions on the packet). If the tree is a little top-heavy and has a tendency to topple over, try balancing it against the side of a mug.
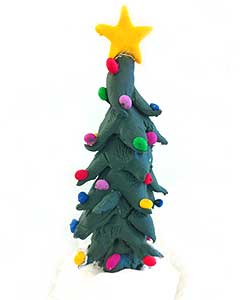
Allow to cool and dry, and stick onto a base of white cardboard if at all unstable, using a good amount of white silcone sealant or glue to create a miniature snow drift. If any of your baubles have fallen off, they can be glued back in place at this stage.
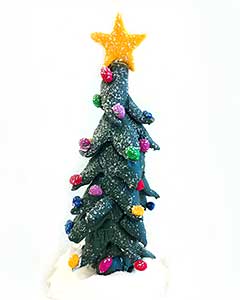
A light coating with snow spray (try spraying from a distance for a more delicate effect) will complete your model and make it look more at home in its frosty winter setting. Alternatively, paint the tips of the branches with a clear glitter nail varnish for an added sparkly effect.
